
This original recipe is an old family favorite that has taken me years to develop a gluten free mix that would work. With just a few simple substitutions this has turned out very well. I was almost in tears when I was kneading the dough. Yes, you heard me correctly, a dough that actually feels like wheat dough when kneading it! As you can see in the picture it rises and bakes beautifully! Don't be put off by the amount of steps it takes to put this together. It is well worth the time.
It is best to read completely through the recipe first.
Preheat oven to 350 degrees
1.
1 small potato, peeled and diced. Cook and mash as you would for mashed potatoes. Or use 3/4 cup left over mashed potatoes.
2.
1 Tbs + 2 tsp yeast (2 packages)
1 tsp honey
1/2 cup water - heated to 110 degrees
Add honey to warm water and stir. Mix in dry yeast. Let proof for 5 minutes
3. Complete this step while yeast is proofing.
2 cups milk - heated just to the boiling point (for dairy free use almond or coconut milk)
1/2 cup butter (for dairy free use Earth Balance soy free, dairy free, gluten free, non GMO margarine)
1/2 cup fructose, xylitol, or honey
3/4 cup mashed potato
3 1/2 cups gluten free flour blend
Gluten free flour blend - Mix together 2 cups brown rice flour, 2 cups white rice flour, 1 cup tapioca starch, 1 cup potato starch, 2 Tablespoons xanthan gum. Yield 6 cups
Add butter and your choice of sweetener to hot milk. Stir until butter is melted. Pour into mixing bowl (use the flat blade not the dough hook). Turn the mixer on low and add the mashed potatoes. Then add 1 1/2 cups flour blend. Mixing in 1/2 cup at a time. (If you don't have a mixer, place the ingredients in a large bowl and mix by hand)
4. With mixer on low add in order:
1 tsp baking powder
1/2 tsp baking soda
3/4 tsp salt
2 cups gluten free flour blend (If using honey as a sweetener increase to 2 1/2 cups)
Turn mixer to medium and let mix for 3 minutes. Mixture should be fairly sticky.
5. This step you are wanting to knead the flour into the dough.
Spread 1/2 cup flour blend onto a dry surface. I like to use a plastic cutting board. It is important to make sure the board you are using has not been used with any wheat to avoid a cross contamination. Next, scrape dough out of mixer onto flour. Begin folding the dough from the outside toward the center. Turn the dough 1/4 turn and repeat. If the dough is too sticky turn it over a couple times to incorporate more flour. It is important to note that the dough will still be a little sticky. (If you look at the picture below you can see a shine to the dough) Knead dough 10 to 15 times, then let rest while you prepare the pan.

6.
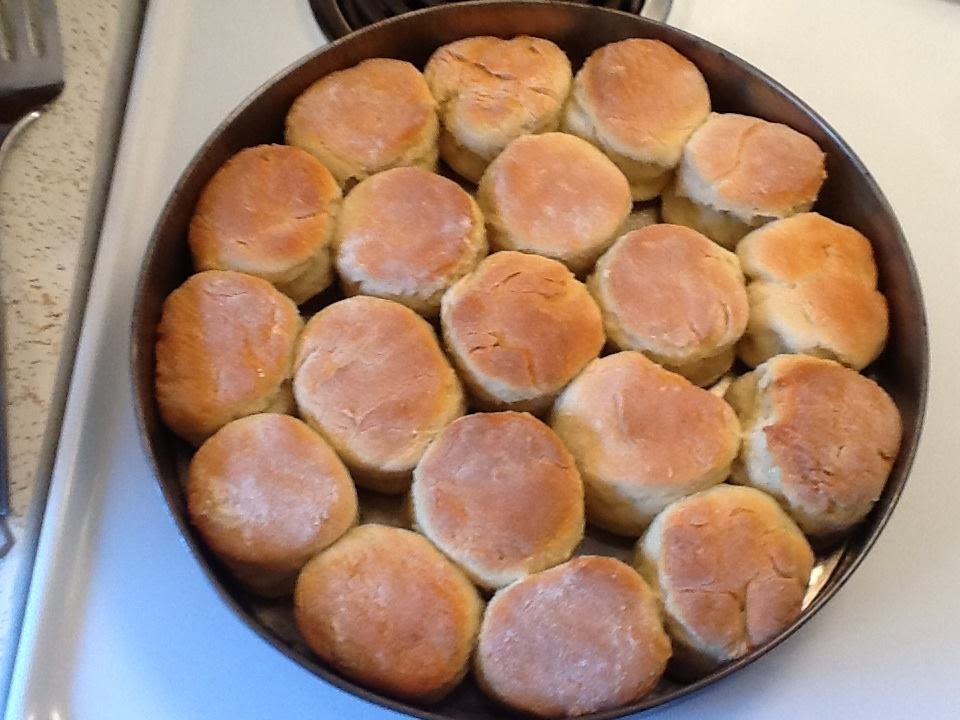
Grease a 9 x 13 pan or a 12 inch round cake pan. Depending on the size you cut the rolls you may need more than 1 pan. I used a 6 ounce drinking cup to cut the dough and a 12 inch round cake pan.
7.
With your hands, beginning in the center of the bread dough, push the dough down and out towards the sides.(You can also use a rolling pin. Again, make sure the rolling pin has not been used on anything that has had gluten in it). You want to spread out the dough until it is approximately 1 inch thick.
8. Cut rolls out with gluten free floured cookie cutter, or cup. I used the same flour that was on the cutting board. Place in prepared pan with the sides gently touching.
9.
Place a dry kitchen towel over the pan. Place the pan on top of the stove (or in a warm place) and let raise for 20 minutes or until close to the top of the pan. Do not let raise to high or they will fall during baking.

10.
Remove towel and place rolls in preheated oven and bake for 20 - 25 minutes. When done remove from oven and let cool in the pan for 5 minutes. Remove rolls and let continue cooling on a cooling rack. Makes approximately 20 rolls depending on the size.
0 comments:
Post a Comment